
SwiftUIのSpacerの使い方
2021年03月09日
Spacerを使う事で HStack VStack を使用する際にオブジェクトを幅いっぱいに効率良くスペースを空ける事が出来ます。
また frame() を組み合わせる事で padding() のような使い方が出来ます。
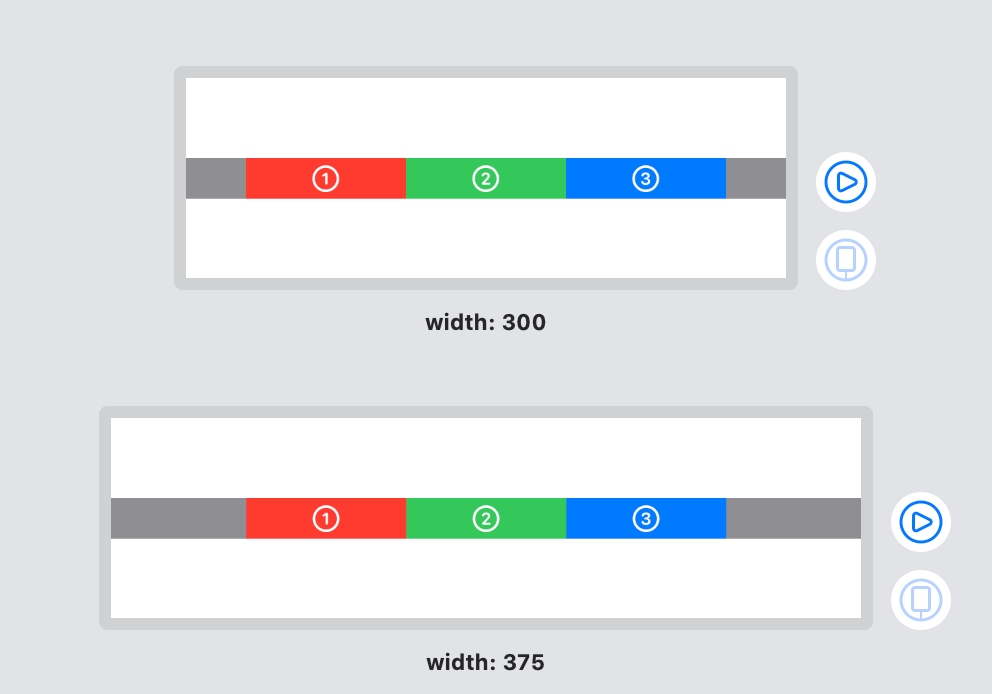
オブジェクトを幅いっぱいに表示する
幅が80の Text を HStack を使って並べています
struct ContentView: View {
    var body: some View {
        HStack(spacing: 0) {
            Text("①")
                .frame(width: 80)
                .background(Color.red)
                .foregroundColor(.white)
            Text("②")
                .frame(width: 80)
                .background(Color.green)
                .foregroundColor(.white)
            Text("③")
                .frame(width: 80)
                .background(Color.blue)
                .foregroundColor(.white)
        }
        .frame(maxWidth: .infinity)
        .background(Color.gray)
    }
}

struct ContentView_Previews: PreviewProvider {
    static var previews: some View {
        Group {
            ContentView()
                .previewLayout(.fixed(width: 300, height: 100))
                .previewDisplayName("width: 300")
            ContentView()
                .previewLayout(.fixed(width: 375, height: 100))
                .previewDisplayName("width: 375")
        }
    }
}
それぞれのオブジェクトの間に Spacer() を設定します
HStack(spacing: 0) {
    Text("①")
        .frame(width: 80)
        .background(Color.red)
        .foregroundColor(.white)
    Spacer()
    Text("②")
        .frame(width: 80)
        .background(Color.green)
        .foregroundColor(.white)
    Spacer()
    Text("③")
        .frame(width: 80)
        .background(Color.blue)
        .foregroundColor(.white)
}
.frame(maxWidth: .infinity)
.background(Color.gray)
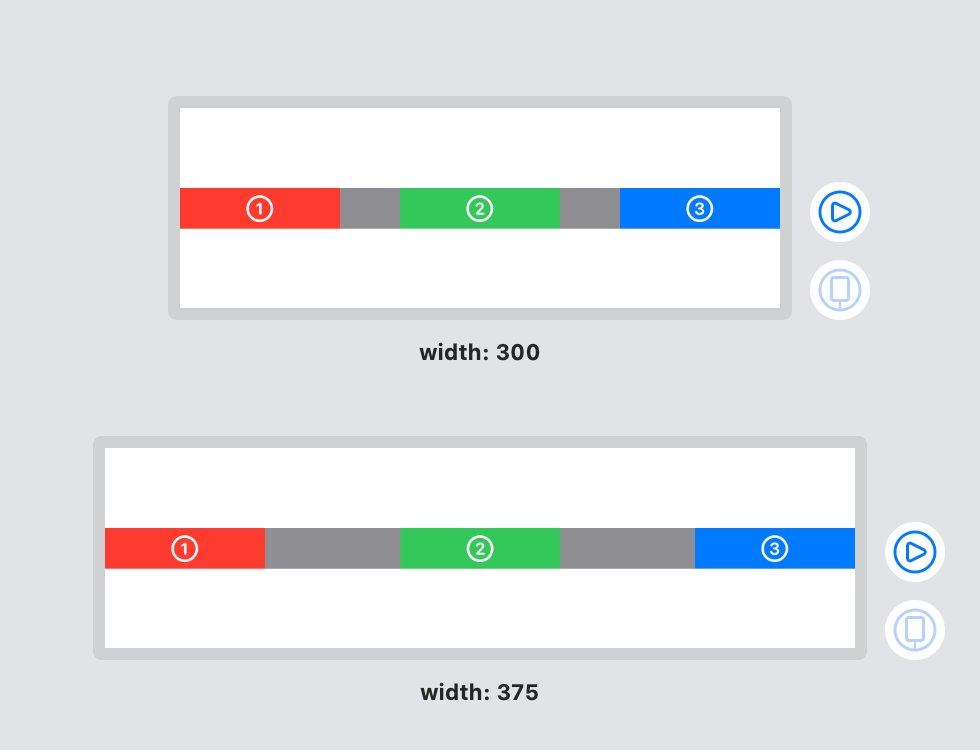
Spacer を複数使った場合、幅いっぱいに表示するのに適したサイズを自動で調整してくれます。
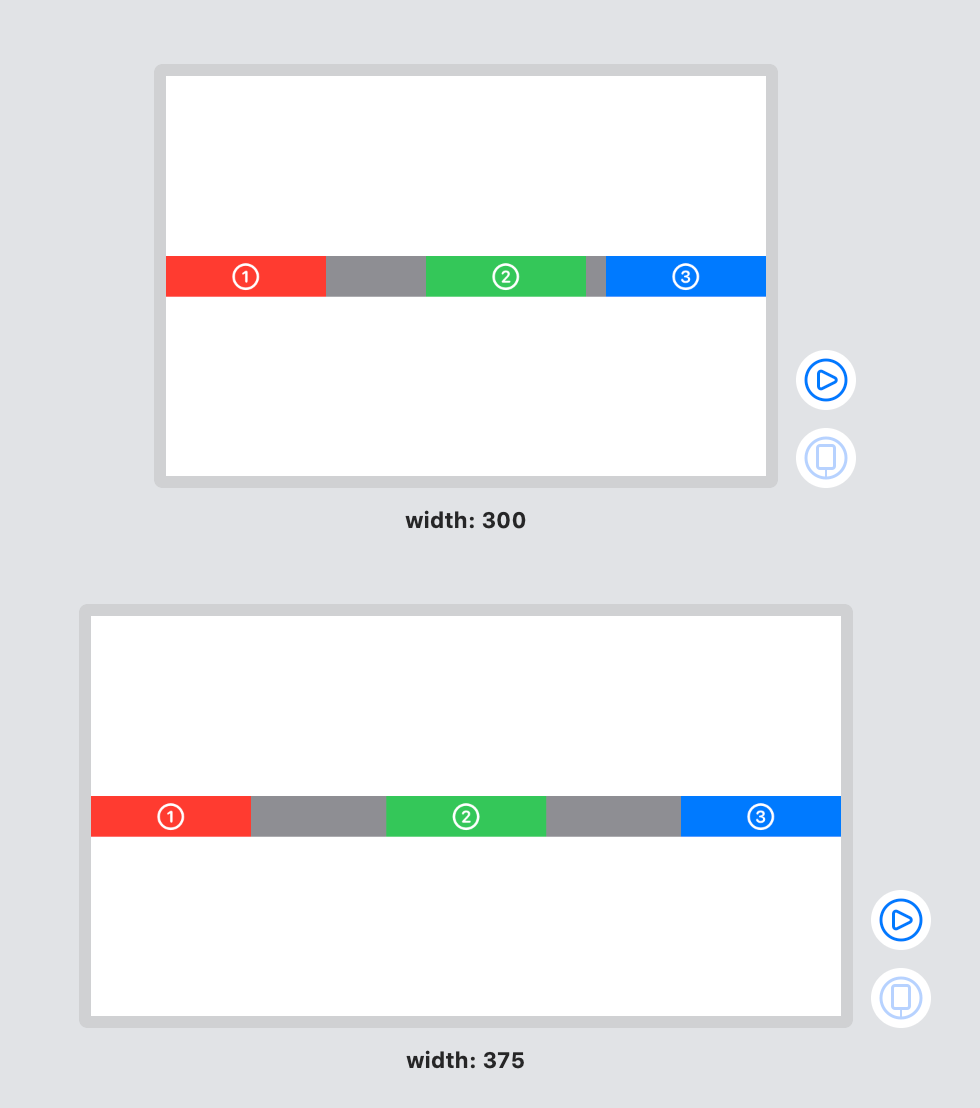
また minLength を設定する事でSpacerが最低限とる領域を指定する事も出来ます。
HStack(spacing: 0) {
    Text("①")
        .frame(width: 80)
        .background(Color.red)
        .foregroundColor(.white)
    Spacer(minLength: 50)
    Text("②")
        .frame(width: 80)
        .background(Color.green)
        .foregroundColor(.white)
    Spacer()
    Text("③")
        .frame(width: 80)
        .background(Color.blue)
        .foregroundColor(.white)
}
.frame(maxWidth: .infinity)
.background(Color.gray)
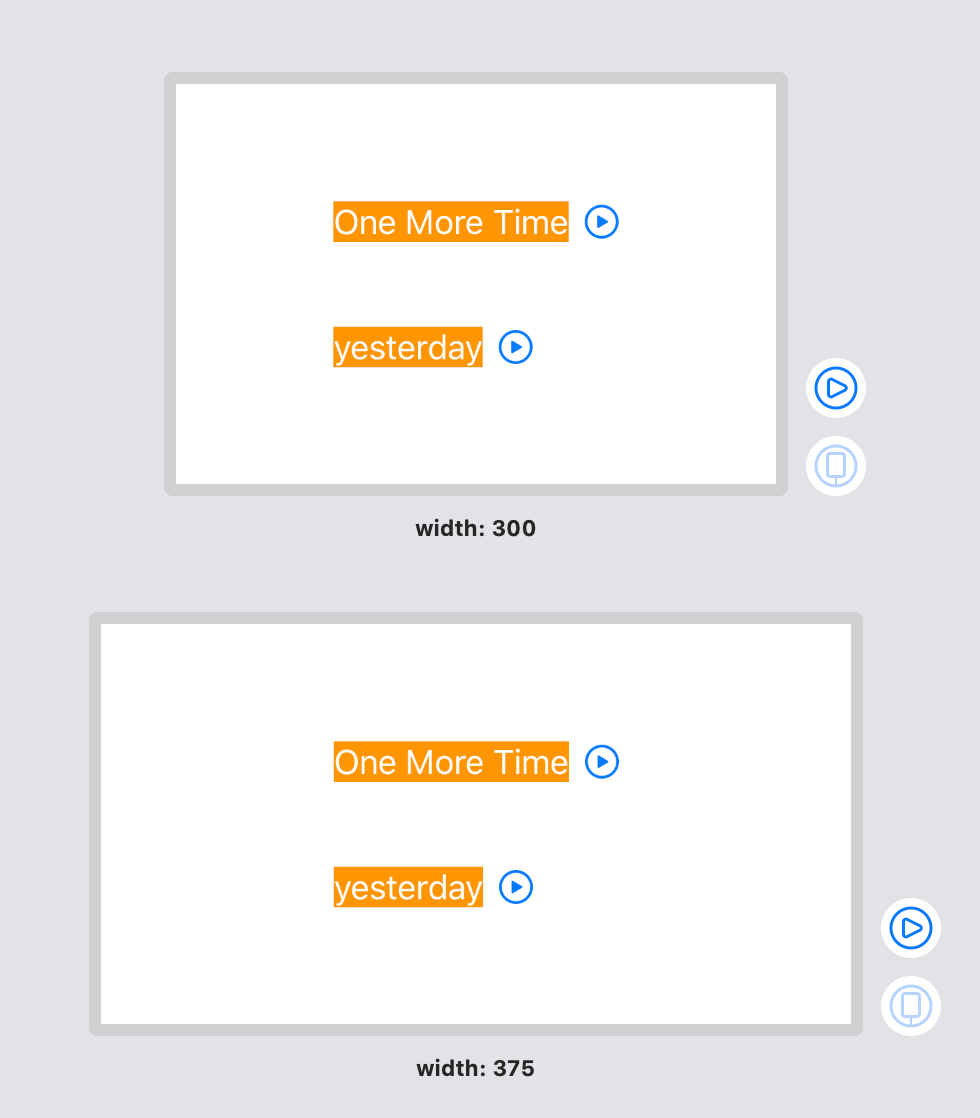
例えば曲名と再生ボタンがあるような以下のレイアウトの場合
(長さが違うのが分かりやすいように曲名部分に背景色を設定しています)
struct ContentView: View {
    var body: some View {
        VStack(alignment: .leading) {
            HStack {
                Text("One More Time")
                    .background(Color.orange)
                    .foregroundColor(.white)
                Button(action: {}) {
                    VStack(spacing: 5) {
                        Image(systemName: "play.circle")
                    }
                }
            }
            .padding(.bottom, 30)
            HStack {
                Text("yesterday")
                    .background(Color.orange)
                    .foregroundColor(.white)
                Spacer()
                Button(action: {}) {
                    VStack(spacing: 5) {
                        Image(systemName: "play.circle")
                    }
                }
            }
        }
        .padding(.horizontal, 10)
    }
}
それぞれの Text と Button の間に Spacer を設定する事で
VStack(alignment: .leading) {
    HStack {
        Text("One More Time")
            .background(Color.orange)
            .foregroundColor(.white)
        Spacer()
        Button(action: {}) {
            VStack(spacing: 5) {
                Image(systemName: "play.circle")
            }
        }
    }
    .padding(.bottom, 30)
    HStack {
        Text("yesterday")
            .background(Color.orange)
            .foregroundColor(.white)
        Spacer()
        Button(action: {}) {
            VStack(spacing: 5) {
                Image(systemName: "play.circle")
            }
        }
    }
}
.padding(.horizontal, 10)
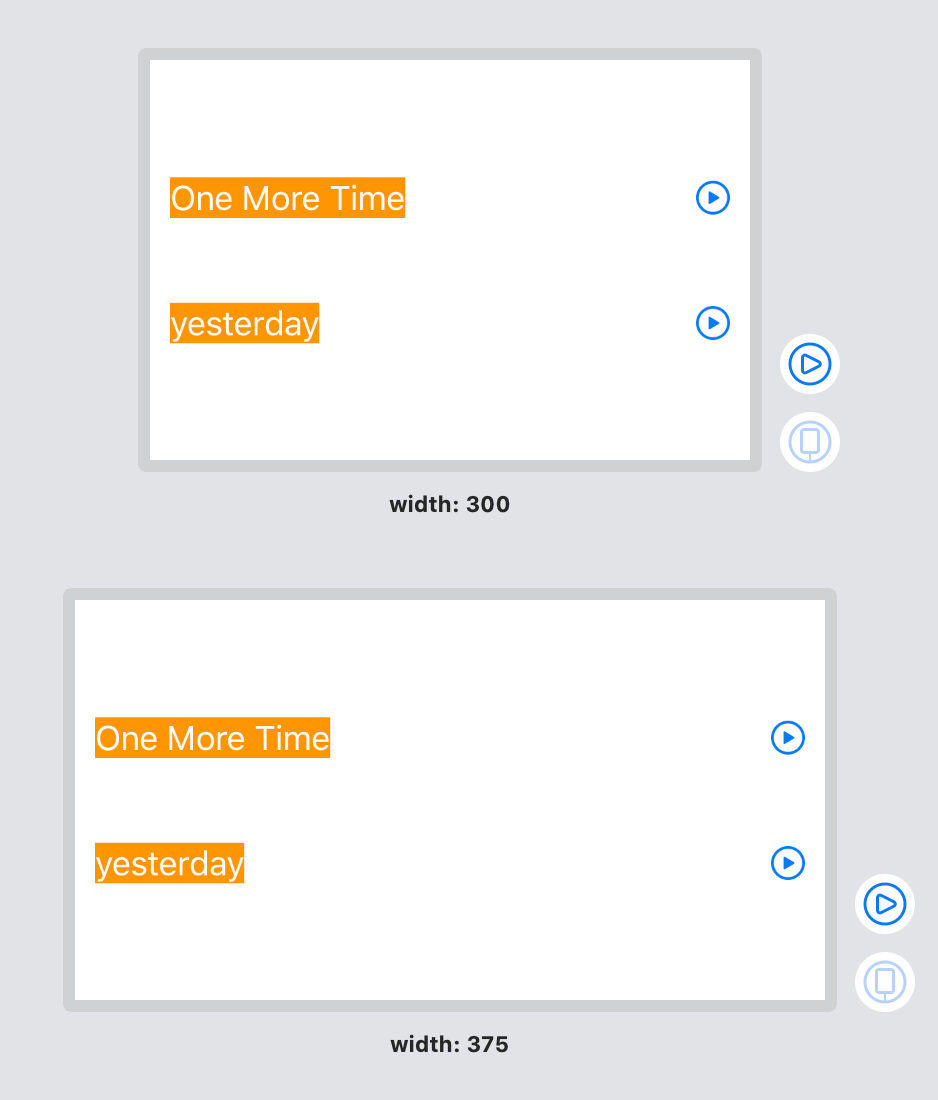
テキストと再生ボタンを画面いっぱいに表示させる事が出来ます
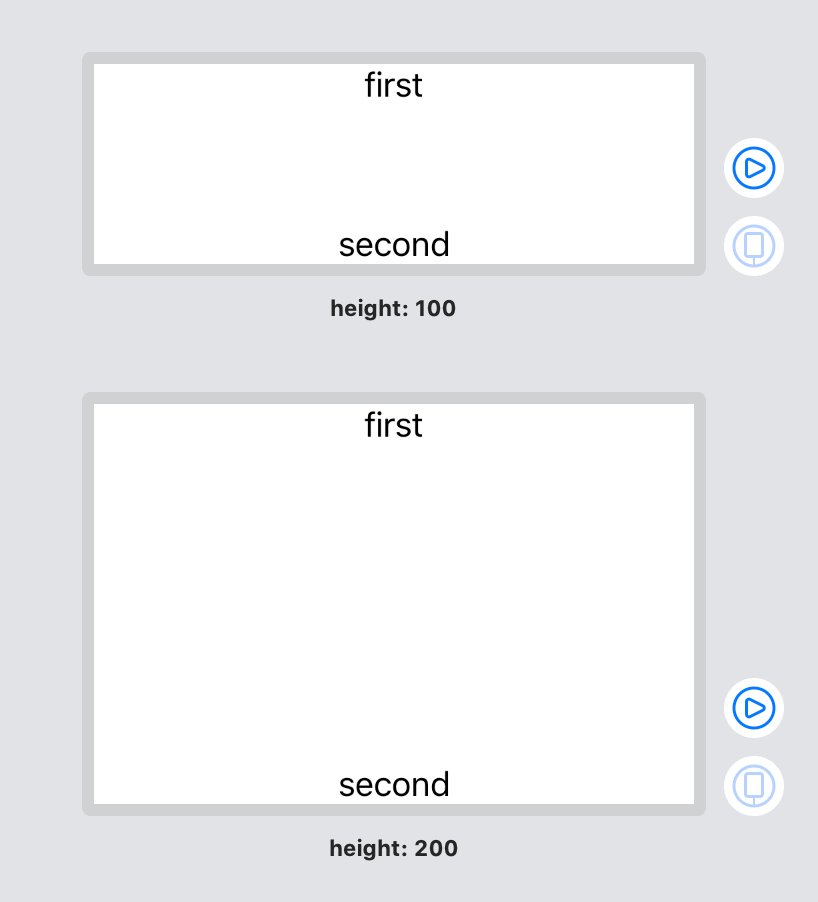
Spacerで広がる範囲を固定する
使う機会は少ないと思いますが、Spacer に frame() を使う事でpaddingのような使い方が出来ます。
例えば以下のような場合、それぞれの Text は画面端いっぱいに広がります
struct ContentView: View {
    var body: some View {
        VStack {
            Text("first")
            Spacer()
            Text("second")
        }
    }
}

struct ContentView_Previews: PreviewProvider {
    static var previews: some View {
        Group {
            ContentView()
                .previewLayout(.fixed(width: 300, height: 100))
                .previewDisplayName("height: 100")
            ContentView()
                .previewLayout(.fixed(width: 300, height: 200))
                .previewDisplayName("height: 200")
        }
    }
}
ここでSpacerに対してframe(height: 40) を設定すると
VStack {
    Text("first")
    Spacer()
        .frame(height: 40)
    Text("second")
}
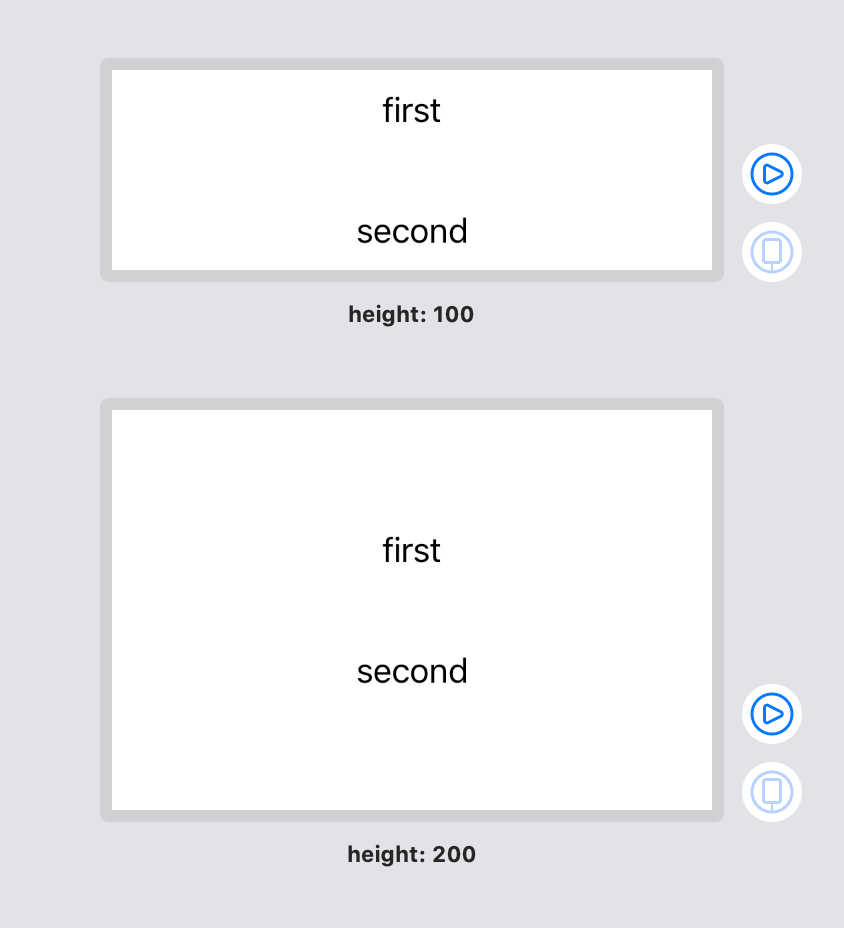
Spacerで広がる高さを固定する事が出来ます